
the SQUAT
#1 MENTALITY
Be ready to lift before you touch the bar
Approach every set, including your warm ups, with the intent to execute quality technique and apply appropriate effort.
Doing this consistently has a compounding effect over time, reinforcing efficient movement patterns, improving consistency and leading to greater long term progress.
#2 GRIPPING THE BAR
Grip the bar as narrow as comfortably possible.
Find a position that lets you create upper back tension without shoulder pain, this may take some trial and error.
Remember to keep your hands consistent every session.
Wrist wraps can help if your wrists are constantly bent back or becoming irritated.
Powerlifting Rule: The hands, thumb, and fingers must remain in complete contact with the bar for the duration of the lift
#3 BAR POSITION
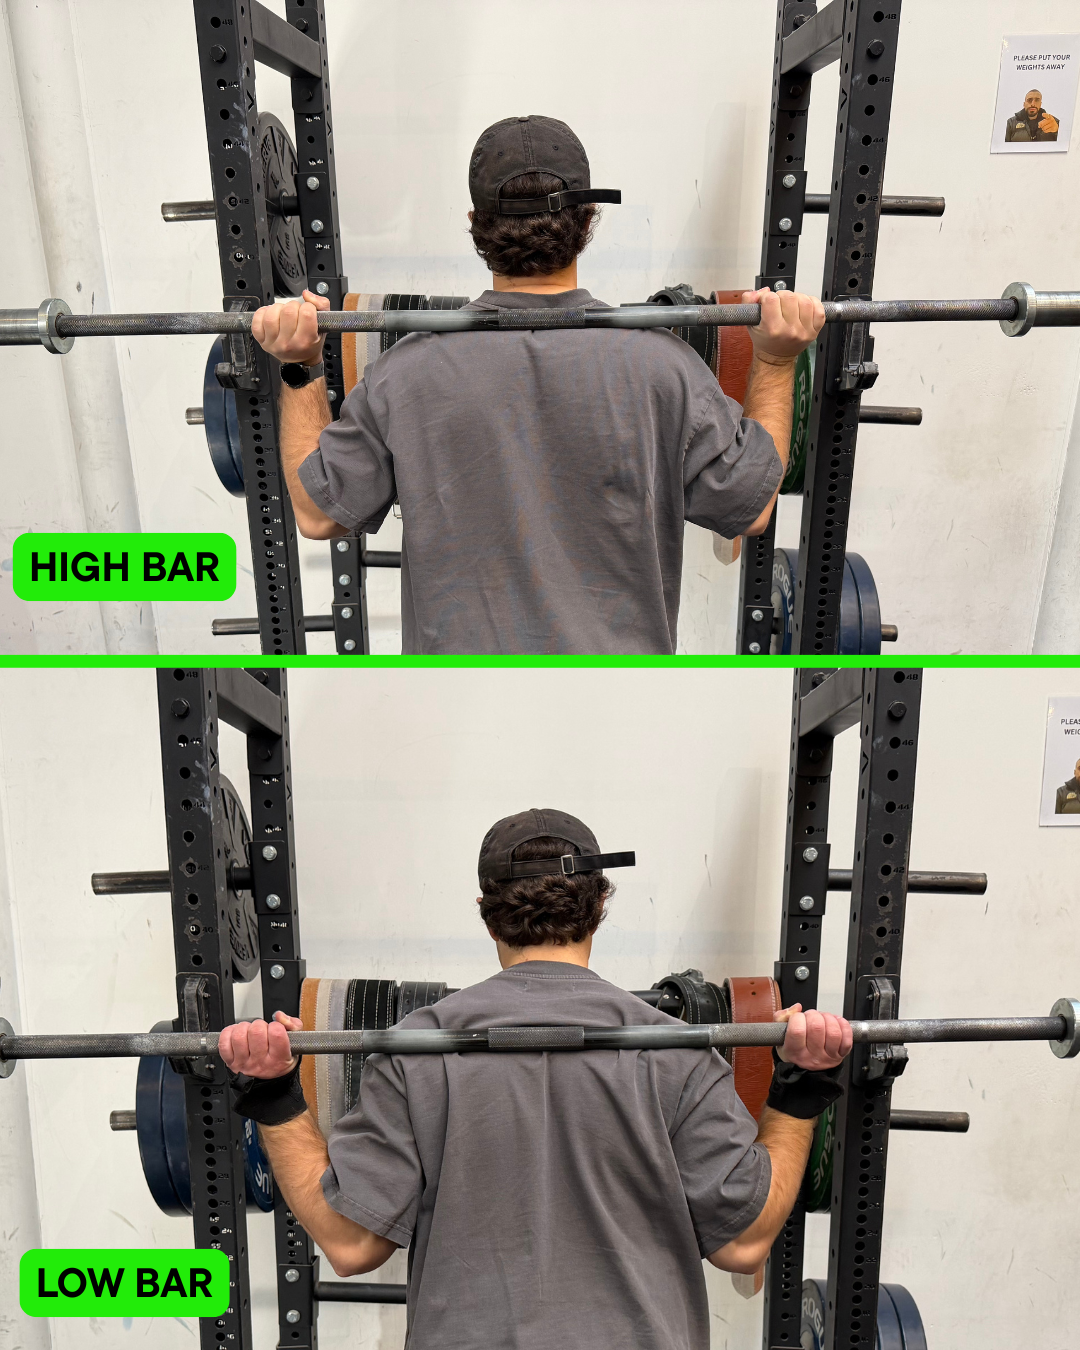
Low Bar vs High Bar
Generally speaking, low bar allows most lifters to lift more weight due to the shorter moment arm at the hips and the increased contribution from the posterior chain. High bar is often easier to learn and feels more natural for newer lifters, as the bar position is simpler to achieve and requires less shoulder mobility.
High Bar
Rest the bar on the thick muscle at the top of your shoulders (upper traps), not directly on your neck.
Squeeze your shoulder blades together to create a stable platform for the bar.
If the bar is resting on bone or causing pain, adjust it slightly lower onto the muscle of your traps.
The bar should feel secure without needing to support it with your hands.
Low Bar
Rest the bar across the muscles at the back of your shoulders (rear delts), just below your upper traps (high bar position)
If you're unsure where the low bar position is, start with a high bar setup. Whilst the bar is still racked, lean your body into it to gently dig the bar lower until it sits securely on the shelf created by your rear delts.
Note: You'll naturally lean further forward than you would in a high bar squat. This position may also demand more of your wrists, so wrist wraps can be useful.
#4 the three step walk out
With the bar in position on your back, start with a narrow stance (feet directly under hips)
Take a big breath, brace, and stand straight up to unrack the bar.
Pause for a second and let the bar become completely still before you start walking backwards.
Take one step straight back with your first foot.
Bring your second foot back into your squat stance.
Adjust first foot to achieve your final stance.
Tip: Practise the exact same walkout on every warm up and working set. A consistent walkout makes your setup more repeatable, conserves energy, and helps you approach heavy lifts with confidence.
#5 foot position & depth
Your foot position should allow you to squat to an adequate depth while staying balanced and maintaining good technique. There isn't one perfect stance that suits everyone.
What is depth?
In powerlifting, a squat reaches depth when the crease of the hip drops below the top of the knee. (In the diagram below, the green arrow points to the crease of the hip)
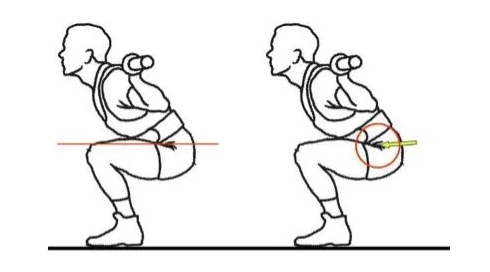
Even if you don't compete in powerlifting, this is a good depth for most people to aim for as it provides a consistent standard and allows you to train through a good range of motion.
Some people may not be able to achieve this depth comfortably due to mobility restrictions, injury history or individual anatomy. If this is the case, squat as deep as you can while maintaining a good brace and mid-foot pressure.
Finding your foot position
Your foot position is determined by two variables:
Stance width: how far apart your feet are.
Foot angle: how much your toes point out.
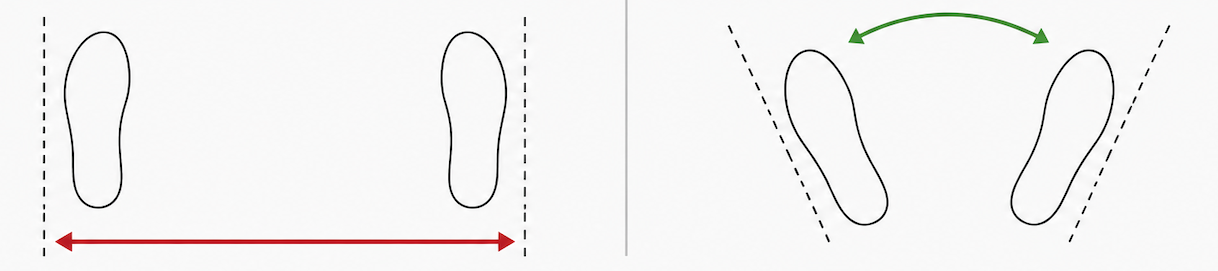
Adjust these variables until you find a stance that allows you to:
Reach your desired depth consistently
Keep your toes and heel on the floor in the bottom of the squat
Keep your knees tracking in line with your toes
Remember: Don't choose your stance because someone else uses it, the best stance for you is highly individualised. Experiment with your stance width and foot angle until you can satisfy the above criteria. Once you've found it, keep it the same every session to build consistency.
#6 BRACING
A strong brace creates a stable torso so you can transfer force into the bar and maintain good positioning throughout the squat. Think of your torso as the link between your legs and the barbell. If that link is loose, you'll lose force and find it much harder to stay in position as the weight gets heavier.
Although there are many different ways people describe bracing, they all aim to achieve the same thing: creating pressure around your entire torso before you begin the descent.
Brace Awareness Drill
Step 1: Empty Your Lungs
Take the biggest breath in you can (through your mouth)
Forcefully blow all of the air out in one go.
Step 2: Feel Your Abs
Take another big breath in.
This time, slowly but forcefully try to keep pushing more air out, even after you feel like your lungs are empty.
As you continue trying to exhale, you should feel your stomach, sides and lower back become firm and tight. You may even notice your abdominal muscles shaking.
This is the feeling you're trying to recreate when you brace.
Step 3: Hold the Pressure
Take another big breath in.
Now try to force the air out, but don't let any air escape.
Keep trying to exhale while keeping your mouth and throat closed.
You should feel the same tightness around your entire torso that you felt in Step 2.
This is what a brace should feel like before and during a squat.
BRACing FOR THE SQUAT
Once you’ve walked the bar out, the bar is still, and you feel balanced over your midfoot (#7), take your breath in for your brace
The brace should be set before you start moving down
If you're struggling to maintain the brace, think about gently pulling your ribs down or “crunching down" slightly to help your torso feel more rigid. This should be a subtle movement, not an actual crunch or rounding of your back.
Hold that brace as you descend and maintain it throughout the entire repetition.
Once you've returned to the top, exhale.
Before every new repetition, take another breath and rebuild your brace.
#7 mid foot bALANCE
A balanced foot provides a stable base, allowing you to stay in control throughout the lift, reach depth more consistently, and produce as much force as possible. If your weight shifts too far towards your toes or heels, you'll become less stable, making the squat less efficient and more difficult to perform.
To stay balanced over your mid foot throughout the squat, you first need to create a stable foot before you even begin the descent.
Think about creating a tripod foot by maintaining even pressure through three points of contact: your heel, the base of your big toe, and the base of your little toe.
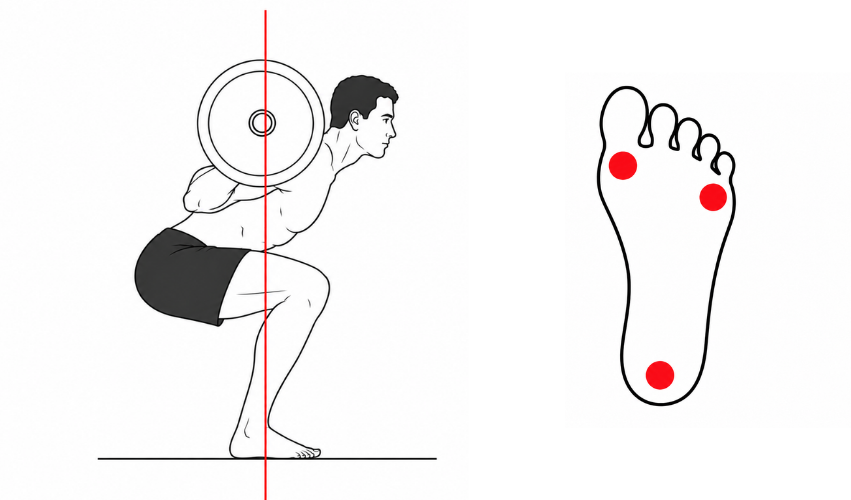
Before you descend, establish this tripod and feel all three points firmly connected to the floor.
As you squat down and stand back up, aim to maintain that same tripod feeling. The pressure will naturally shift slightly, but all three points should remain in contact with the ground.
If one point lifts or loses pressure, you've likely shifted your balance too far forwards or backwards.
#8 the descent
A smooth, controlled descent helps you stay balanced, maintain your position and put yourself in the strongest possible position to drive back up.
Descending too quickly often leads to losing balance, collapsing out of position or bouncing into depth without control. On the other hand, descending too slowly can waste energy and make the squat feel much harder than it needs to.
The goal is to find a speed that is controlled, deliberate and efficient.
How to Descend
Ensure you feel balanced over your midfoot (#7) first
Begin the movement by breaking at the hips and knees together.
Start the first third of the descent under control to establish your balance and positioning.
As you approach the bottom two thirds of the squat, allow your descent to become progressively faster while remaining in control. (this shouldn’t feel like you’re free falling)
Reach your desired depth, then immediately reverse the movement
#9 DRIVE THROUGH THE BAR
Once you reach depth, the goal is to reverse the movement and stand up as quickly as possible. Heavy weights may move slowly, but your intent should always be to move the bar fast.
Drive your upper back firmly into the bar as you stand up.
Think about moving your body through the bar rather than simply lifting the bar off your back.
Maintain your brace and position as you pass through the hardest part of the lift.
Keep pushing until your knees and hips are fully extended.
#10 reset every rep
Each rep should begin from the same balanced and controlled position. Taking the time to reset helps you maintain your technique as fatigue builds across the set.
let the bar settle at the top
feel your feet balanced
fully take your breath in and brace
then go again!